Douglas Miniatures Logo

Douglas Miniatures Logo

Wednesday 20 December 2023

Battle for the Crossroads 1815

 The French army is on the move and the allies are deploying to counter the French advance.  At a small crossroads in Belgium elements of a Dutch brigade make preparations to stem the French advance. The battlefield consists of a small village that sits where two major routes converge.  On one flank there is a large dense wood, while on the other sits a walled farm and smaller wood. The land rises on both sides up to low ridges. 


It is vital that the French do not gain control of the village and the crossroads.  Leading the advance is Marshal Ney with a combined arms corps.  Rushing forwards on the Allied side are more Dutch and Nassau troops as well as the complete Brunswick Black Corps.  The questions is, will they arrive in tome to check the French?

French light infantry are in the vanguard and have orders to capture and hold the large wood on the left:

French light battalions working their way through the woods.
The first Brunswick and more Nassau troops begin to arrive behind the village
As the French light near the far end of the large wood they are met by Nassau infantry who fight hard.
The Nassau troops begin to halt the advance of the French light as fresh Dutch and Nassau battalions arrive in the field.
Meanwhile, the bulk of the French line infantry arrives and occupies the low ridge along with some artillery.
At the same time more Brunswickers can be seen approaching the farm complex.
The French, having been unable to force a way through the woods make a move in the centre, advancing three battalions with cavalry and artillery support.
After a brisk battle the churchyard dominating the crossroads falls to the French, however, the village on the other side of the crossroads is strongly held by Brunswickers. Dutch artillery and small arms peck away at the French defenders.
Several Brunswick artillery batteries with infantry cause problems for the French in the centre, so some French cavalry regiments are pushed forward to counter the threat. The Brunswick Hussars, led by the Black Duke himself and supported by horse artillery mounts a counter attack.

Regrouping the French Hussars move forward again.  The Brunswick Hussars are destroyed but a charge by the Brunswick Lancer squadron causes more damage.   The French light cavalry are driven off once more.

A second French cavalry brigade arrives on the field and a clash with the Brunswick Lancers takes place. The Lancers do well but are overwhelmed by the French and driven off.


The French deploy more artillery but casualties around the church and village are mounting.  The battalion that successfully took the church is forced out and destroyed.  Another French battalion moves forward to take the church back, while the French cavalry, reorganises itself.

The battle in the large wood has become a stalemate, with neither side being able to make progress.
The number of casualties around the crossroads mounts.  All of the Brunswick cavalry are now destroyed but the French cavalry are badly mauled too.  Adding to the French woes, two commanders are unhorsed and leave the field, including Ney himself!

The French emphasis now shifts over to their right flank.  French skirmishers are ejected from the small wood by Brunswick light and Jaegers moving around the walled farm:

However, a massive French infantry assault is building up.
This leads to another battle in woods, this time on the right flank.  Once again the French make little progress and several battalions are seen streaming to the rear.

With casualties mounting and time running out the French try one last ditch attempt to force the allied right and push several fresh battalions into the large wood:


A Brunswick horse artillery battery is destroyed and a Brunswick and another Nassau battalion are destroyed but it is not enough.  Nassau troops cling on to the woods and as evening sets in the French call it a day.  The score is 11 all, however, the Brunswickers remain firmly in charge of the crossroads; the stalemate giving them a victory.


Wednesday 6 December 2023

Rapid Fire

 Will and I plan to have another go at Rapid Fire.  In our last couple of games the defending Germans defeated the assaulting US army, mainly due to the presence of two Panther tanks.  The US Shermans were no match, after which the US infantry was rolled up quite quickly.

We agreed that our next game would involve less powerful tanks on the German side.  With that in mind I have acquired a couple of Panzer IVs and a pair of Stug IIIs.  Should we confront the Panthers again I now have some 76mm armed Shermans too.

A shortcomings during our last game was the lack of artillery observers and we had to use random command figures in this role, so I have now created one each for the US and Germans.  In addition I have produced a German sniper team:


As with the other of my Rapid Fire forces, I am using the versatile Valiant plastic figures.

Once I have completed the new tanks and other figures I will show some pictures.

Tuesday 28 November 2023

More Airfix Romans

 I have finished off the last of my Airfix Roman infantry, although I still have a unit of archers to paint. In this instance, I have repositioned the shields to give a more realistic appearance:

I also had a chariot in the box and could not resist painting it, although it will likely be reserved for the Triumph in Rome!  Here is General Ludicrous Sextus urging the troops on!


My Airfix Roman army so far:


Friday 24 November 2023

Airfix Romans

 Airfix Romans get a very poor write up regarding their accuracy, poses and quality. That said, I had a few kicking around and thought I would slap on some paint just to see how they turn out.


The figures are quite poor and the weapons and armour are a bit weird, however, after a bit of painting they begin to improve.  The question is, do I continue with the Airfix figures or try something better?


I will likely try several different types before I settle on something.


Thursday 23 November 2023

Ancient British Army

 It has been a while since my last post but this is because I have been head down painting an Ancient British army.  The idea came when I was sorting through some old boxes when I came across a load of Airfix 'Ancient Britons' figures.  There were some Romans too.

I have never painted these figures and my initial go was enjoyable and so the idea for a full army emerged.  I managed to find some more, including a pile of chariots on eBay.  I swapped the clunky solid wheels for those off the RHA set.  Cavalry came from an Italeri set.  There are some additional ESCI and Revell figures in the warbands to boost numbers.


Altogether I have 10 warbands, nine chariots, making four units, three units of archers, two of cavalry and a chariot borne leader.

I have started work on some Romans, although I am undecided whether to employ Airfix figures for this part of the project.  I will paint a sample unit to see what it looks like.


Sunday 5 November 2023

Airfix French Line Infantry

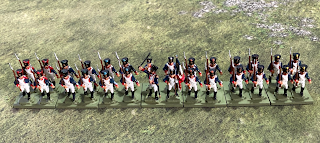
 Every once in a while I get enormous pleasure from painting the old Airfix plastic figures.  With all of their inaccuracies and silly poses, they do look rather delightful after a splash of paint.

Just for fun I renovated these old 'Waterloo' French line infantry.  They officer is a conversion, using the head and torso of the mounted figure:

One day, it might be fun to play a small game with these figures.

Friday 27 October 2023

WW2 Rapid Fire Game

 I have been itching to have a go at Rapid Fire, having bought the rules last year.  I have watched a few games and understood the basics.  Will came over a few days ago and it seemed like a good opportunity to have a play.

For the game, I cobbled together a US infantry battalion and a battalion minus of German troops.  The US had four Sherman 75mm tanks and the German two Panthers.

The Germans occupied a small village and crossroads in bocage/Normandy type terrain.  Each side had a mortar platoon, a couple of heavy machine guns, anti tank teams as well as rifle companies:


The Germans concealed themselves in some of the buildings and their two tanks covered likely amour approaches


A full company lurks behind a hedge, with an anti tank team. The Germans have an OP in the tall building. A machine gun covers the road.
The US forces start in a farm complex, with their OP in the roof of the arched building.  Sherman tanks are lined up along a track:
The action kicks off with the US advancing on their right, quickly bring down mortar fire on themselves:

Shortly after, the four Shermans advance with two entering into a field.  A Panther moves forward and quickly knocks one out.  Mortar fire still rains down on the US infantry, but does not cause many casualties.
A third Sherman attempts to move around the flank, supported by more infantry.
However, the second Panther advam]nces and quickly destroys this Sherman and effectively prevents the infantry advancing.
A bazooka team creep forward to try and take out the Panther on the road and they attract some more mortar fire. Supported by two Shermans the Bazooka eliminates the threat from the Panther, leaving it burning in the road.
With the threat from the Panther gone, US infantry can now move across the wheat field and flank the German machine gun covering the road
The German machine gun withdraws and once again mortar bombs rain down on the US troops in the wheat field.
One of the German anti-tank teams moves down the road to counter the US advance in the centre but attracts the attention of the US observers and they too suffer from a mortar bombardment.  Also, the second Panther reverses back to the road and moves over the the area of the crossroads to deal with the remaining Shermans.

With the second Panther out of the way, US infantry that were held up are able to advance, but they run into another German machine gun and infantry in one of the buildings.  They suffer casualties and are effectively stopped in their tracks.

Meanwhile, the second Panther appears on the road and destroys the two remaining Shermans.  In the far distance US infantry work their way through the orchard but are ambushed by more concealed German infantry, taking more casualties.  The US infantry in the wheat field push through the hedges and enter the fir wood but they too come under heavy fire from nearby buildings and the second German machine gun.
US mortar fire stops the machine gun from being too effective, but with all of the US tanks destroyed, a Panther on the loose and at least two companies of German infantry in the village, with mounting casualties, the US attack falters.

This first attempt with these rules worked quite well once we had got to grips with them and the game moved quite quickly.  The Shermans made little impression on the Panthers.

We set up a new battle and swapped sides.  Initially the US did well however, once the panthers appeared on the scene the result was very similar.  US troops left the field tail between legs leaving their burning tanks behind.  It would be interesting to play again with less powerful German tanks.

The figures used are all by Valiant Miniatures and the tanks are Italeri Fast Builds.


Thursday 19 October 2023

Clash along the Nile

 Bob Black came over for a game yesterday and I was keen to have another go at C&C Ancients, introducing light chariots and 'warrior' class infantry.

The setting for the battle was based on the idea of a Roman force in southern Egypt moving along the Nile valley to put down a troublesome Nubian presence that had been harassing Roman trade routes.  As the Romans work south they find their path blocked by the Kushite enemy:


The Roman left wing

The Roman right wing
Kushite warriors and chariots
The view across the battlefield.
I played the Romans and Bob the Kushites.  I was pretty confident that my heavy infantry could ram through the lighter Kushites, after which my cavalry would run them down.  However the Gods were not on my side that day as I studied my tactic cards.  Nearly all applied to my left wing, where I only had two units.  With limited options I hoped that things would improve as the battle unfolded.  I kicked off by moving my archers forward to harass his centre.  Bob had no foot light troops and his cavalry was on the wings so I felt fairly safe:
Error - Bob had a card that allowed him to rapidly close on my archers, which had done very little damage, and cut them to pieces, forcing them to retreat:
I now moved my mass of infantry into the centre to threaten his infantry that had driven off the archers:

This initially worked well as a Kushite unit is badly damaged and another forced back.

But, now my ability to continue this assault is restricted by the cards and several attacks force back and cause casualties amongst my infantry.

Despite causing damage I am unable to make real inroads into his line. Bob then counter attacked with his cavalry and chariots
Initially I was able to check this advance with my left wing cavalry,  However, by now I had lost three units to Bob's one
On the opposite wing my cavalry counter attack met with some success wiping out some Nubian horsemen, but my cavalry were destroyed in the process.
Now Bob was able to deliver a hammer blow with a massive advance.  I was unable to counter this and the Roman army collapsed. 
My commander fell on his sword with the battered Roman army pulling back from the field.
The gods had betrayed the Romans and the Kushites proved to be a hard hitting nimble foe, while my Romans were fixed and unable to respond.  I probably should have thrown my cards in on turn one and hoped for a better hand.  Next time...............