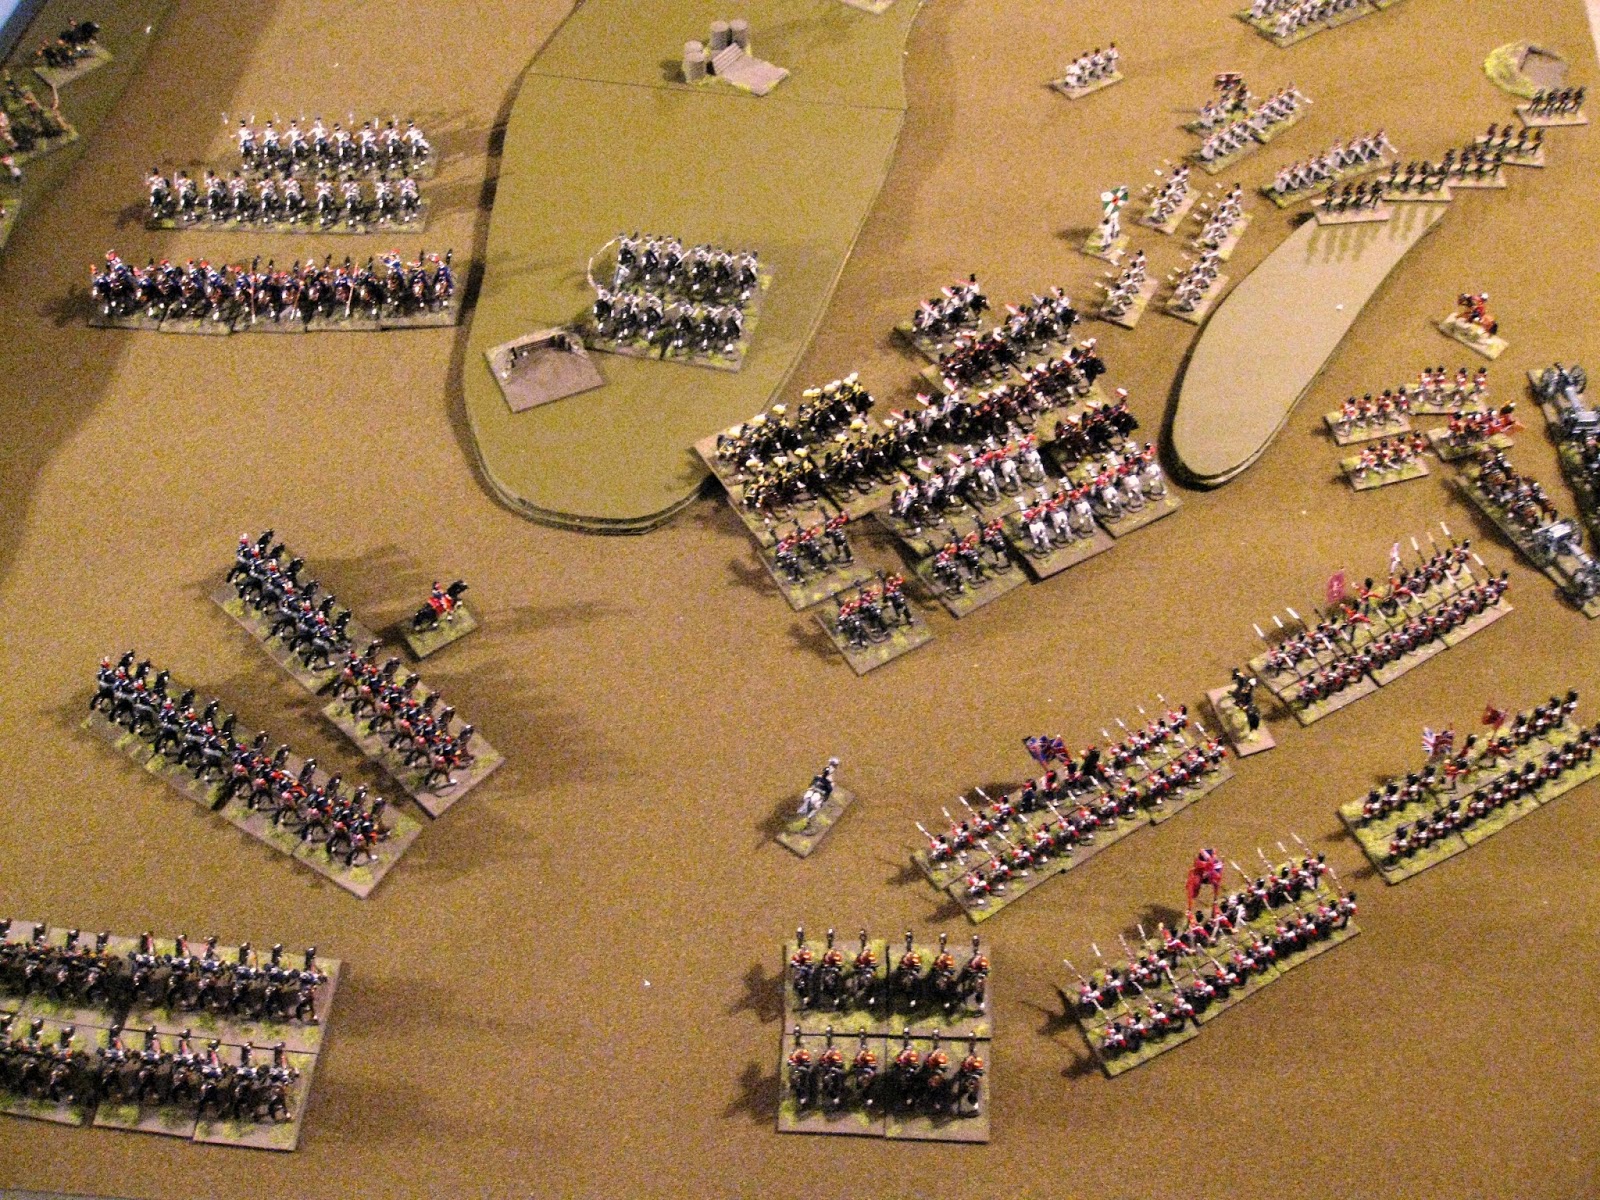
Douglas Miniatures Logo

Douglas Miniatures Logo

Thursday 12 November 2015

Balaclava – End Game


From the Sapoune Heights Lord Raglan watches the Light Brigade regiments withdrawing back to their start positions, satisfied that they have driven off the enemy cavalry, albeit with serious losses.  Below him to his right the 1st Division is positioned at the mouth of the South Valley and the 4th Division is almost deployed on their left. In addition a French infantry division is establishing itself opposite the North Valley. Raglan knows that to secure Balaclava and resume the siege of Sebastopol he will need to regain control of the Causeway Heights and recapture the redoubts, whose guns have been taken by the Russians. He is troubled by the torrent of strong messages coming from the Sebastopol siege lines that suggested that the siege was threatened by the removal of so many troops. Over his shoulder the sun is sinking below the hills in the late October sky.


As for the Russians, Liprandi, gazing across the valley towards Raglan, weighs up the situation.  He is convinced that the British will attack the heights and, with the Battle of the Alma fresh in his mind he knows that he could not defeat an assault by three allied Divisions. There is no sign of movement as yet, so he decides to consolidate his defensive posture on the Causeway heights and await Raglan’s next move:


Raglan calls in the Division Commanders as well as the French leaders for a council of war. He issues orders for an attack at first light on 26 October. 1st Division is to drive up the South Valley and retake the eastern end of the Causeway heights, including Canrobert’s Hill (off the board). 4th Division is to storm the heights and recapture No 5, 4 and 3 Redoubts; while the French are to sweep around the North, secure the Fedioukine Hills and the North valley.

26 October:
The allied staffs, including Lord Raglan, arrive at HQ on the Sapoune Heights. Below the British and French infantry are preparing to move. A messenger from Lucan arrives advising Raglan that light cavalry scouts report that the Russians have gone. During the night they have withdrawn back to their positions occupied before the battle. The allied assault is cancelled and the battle is over.

Balaclava Analysis:
Who won? Based upon the game objectives it is clear that this is an outright win for the Russians. To win they had to be in control of the Causeway Heights at the end of the battle. That was achieved. The Russian strategic objective was to undermine the siege operations against Sebastopol and that too was achieved by threatening the main allied supply base at Balaclava harbour and by drawing large numbers of troops away from the Sebastopol siege lines. That said, the effect was short lived as the Russians withdrew during the night, allowing the allied forces to return to the siege. Overall I consider this to have been a total victory for the Russians.

Observations:
Introducing the variables of characters and reactions to orders added enormous fun to the battle. It also meant that the outcomes of actions could not be easily predicted and brought in an element of realism, especially for the allies, which suffered from the clash of personalities, confused command and delays.

The rules:
Once again I used my own rules and mostly they worked well; however, I had to modify the melee rules somewhat to take into account fresh troops being committed to an ongoing melee, flank attacks and multiple unit action.

Overall this was the most ambitious Crimean action so far – but very enjoyable.


Wednesday 11 November 2015

Balaclava - The Cavalry Action

From his vantage point on the Causeway Heights the Russian Commander Liprandi looks across the South Valley with some satisfaction. His infantry have control of the area and, apart from some musketry from skirmishers, the valley is quiet once more.


To his right his cavalry have the upper hand in the brawl with the Heavy Brigade, although the fighting is intense. Further to the right he can see more British cavalry wheeling right with the apparent intent of taking his own cavalry in the flank.  Quickly identifying this new threat he issues an order to his mounted troops in the North Valley along with a Regiment of dragoons on the heights to counter the threat.

As for the British, the two regiments of hussars are now cantering up the slopes of the heights with their speed increasing. The Russian dragoons fail a charge test and the 8th Hussars slam into them pushing back the front ranks. The 11th Hussars plough into the flank of the Russian 13th Lancers, who are close to routing the Inniskillings. A second fierce cavalry action begins:


Meanwhile in the North Valley, Lord Cardigan anticipates the Russian’s next move. Unless he acts he can see more Russian cavalry turning the Hussar’s flanks. He orders the 17 Lancers and the Light Dragoons to engage the enemy cavalry to their front. The two regiments, with Cardigan at their head, trot forward and break into a gallop. To their front are three Russian regiments; the 2nd Lancers, Ingermannlandski Hussars and a unit of Don Cossacks. Battle is joined:

The Light Dragoons make short work of the Don Cossacks; however the 17th Lancers do not do as well, taking heavy casualties as they collide with the Hussars.


Up on the Causeway Heights, their horses blown and severely battered, the remnants of the two Heavy Brigade regiments break and retreat towards the west. Over 50% of their number are either casualties, lost their mounts or are taken prisoner. The Russian cavalry are also exhausted and seeing the scarlet ranks of the deploying 1st Division, they trot to the rear to reorganise.


Back in the North Valley Cossacks up on the Fedioukine Hills begin to wheel left and threaten the flank of the Light Dragoons; however the French 4th Chasseurs d’ Afrique have been shadowing the action in the North Valley and they charge into the Cossacks with devastating effect. The Cossacks quickly turn tail and the French cavalry pursue them, hacking their way through a Russian artillery battery that is in their way.


On the Causeway heights the British Hussars are also successful the 11th Hussars shatter the Russian 13th Lancers, who break and gallop off to the rear. Equally successfully the 8th Hussars rout the Russian dragoons. But the action is costly as over 100 hussars are killed, wounded or dismounted. To add to their woes, the Russian 17th Lancers have reformed and charge into the flank of the 11th Hussars, causing more casualties. The battle on the heights culminates with the British hussars withdrawing back towards the allied lines, but the exhausted Russians do not follow up. To do so would bring them into range of the British infantry who are now at the mouth of the South valley.


In the North Valley the British 17th Lancers break off the action and the recall is sounded for the Light Dragoons, who face another fresh Russian regiment – the 2nd Lancers.  Again the Russians do not pursue. Over to the west they can see a mass of blue uniforms as French infantry develop a defensive line below the Sapoune Ridge. The 4th Chasseurs d’ Afrique, having seen off the Cossacks and a battery of guns, trot back to their start positions.


It is late afternoon and the battle field falls silent save the chink of the cavalry as both sides ride to the rear and reorganise. In the North Valley the action breaks off too.


Tuesday 10 November 2015

Balaclava - The Russian Assault

As mentioned in my previous post the Marines fire a devastating volley into the Caucasian Cossacks, who break and gallop off to the rear:


However, almost immediately the Marines are peppered with musket balls and shot and a column of Russian infantry charge into them. Despite fighting fiercely they are forced off the ridge and withdraw to the inner defences of Balaclava. This exposes the British redoubt, which is also stormed by the Russians and crushed.

Having beaten off the cavalry the Turkish Battalion is ripped into by a musket volley followed by a bayonet charge. The Turks crumble and run to the rear.

This leaves only the 93rd, who are now suffering casualties from Russian jagers and two regiments of infantry. They fire a volley into one of the Russian regiments, which halts and reties. However, the pressure is too great and their flank is threatened by more infantry. Sir Colin Campbell takes a musket ball in the arm and falls from his horse. The 93rd pulls back from the ridge pursued by the Russians:


In the centre Lucan looks on in horror as the Inniskillings and they Greys are sucked into the massive cavalry melee. His staff urge him to send reinforcements, but on testing he refuses. (He can see the headlines in London "Lucan loses the Heavy Brigade". At the moment he can blame Raglan, who ordered them to support Campbell.


A few minutes later a message arrives from Raglan ordering him to attack the enemy cavalry on the Causeway Heights. Lucan canters over to Lord Cardigan and he instructs Cardigan to carry Raglan's order. Cardigan protests pointing to the massed enemy cavalry in the North Valley. After a serious argument, Cardigan wheels his horse and gallops back to the Light Brigade. He orders the 8th and 11th Hussars to attack the enemy cavalry up on the ridge, while instructing the 17th Lancers and 4th Light Dragoons to cover the North Valley. Surprisingly, in the face of overwhelming odds he splits his Brigade.

Pleased to see some action the two British hussar regiments wheel towards the Causeway Heights:


It is now past midday the bulk of the British cavalry are committed, the Russians have driven off all allied forces from the outer defences of Balaclava. The Russians have achieved their strategic objective, but the allied reinforcements continue to build. This is the overview of the field:


Monday 9 November 2015

Balaclava - The Allies Wobble

Having secured the Causeway, General Liprandi, the Russian Commander, surveys the allied positions below. He can see the thin shield protecting Balaclava and off to his right he can just  make out the massed ranks of the British 1st Division closing in. He has the advantage of the high ground and a concentration of forces opposite the weak allied centre. He has two choices. He can sit tight and defend his gains, or move quickly and do as much damage to the allies before they reinforce. He decides upon the latter course of action and hatches a plan to capture the high ground that overlooks the harbour. He orders his cavalry to advance towards the 93rd's position and up the South Valley, supported by three regiments of infantry. At the same time he orders two more infantry regiments, with guns and cavalry to assault the Royal Marines and Turks.

Meanwhile, up on the Sapoune Heights Lord Raglan dithers. He does not have the strength to assault the Causeway Heights and he decides to wait to see what the Russians do next. Down in the South Valley the Allies see an increasing wall of troops moving towards them:


General Scarlett can see the developing threat and requests Lord Lucan, Commander of the Cavalry Division, to send up the remainder of the Heavy Brigade. Lucan refuses, stating that he only has orders for two Regiments to deploy in support of Campbell. He is annoyed because he feels he should have overall command of the operation, but Raglan has split command between Campbell and Lucan creating yet more tension.

The 93rd can see a mix of infantry and cavalry moving towards them:


While over on he right, the Royal Marines come under a heavy bombardment as Russian infantry, supported by Cossacks, closes in:


Scarlett decides to act. Ignoring Lucan, he orders his two Regiments to charge the advancing Russian cavalry and he leads them forward. The Russians are tested to see if they waver, but, on the contrary, they charge forward to meet the Heavies;

A huge melee ensues, with the Scots Greys being battered and pushed back, while the Inniskilling Dragoon Guards carve their way into the Russian lancers. Scarlett at the head of his Brigade takes a lance through the chest and is killed.

At the same time Cossacks and infantry charge the positions held by the Turks and the 93rd:


The Turkish infantry fire a volley and smash the Russian Cossacks, who turn tail. A similar fate awaits the Ural Cossacks, as they attempt to ride down the 93rd. Over 100 are shot from their saddles and their charge is halted. Supported by the British redoubt the Turks now face the Russian infantry


A third Regiment of Cossacks attacks the Marines and once again the are cut down by the minie rifles, however, the failed cavalry attacks have bought time and space for the Russian infantry who close in on the allied positions and are about unleash a storm of their own.....


Sunday 8 November 2015

Balaclava - The Opening Moves

The Russian Commander, General Liprandi, buoyed by the rapid collapse of the first two redoubts and the lack of response from the allies decides to press forwards and take the the rest of the Causeway Heights. A mass of infantry, supported by guns and around 3,000 cavalry start moving towards redoubts 3 and 4.

Meanwhile, up on Sapoune Heights Lord Raglan, who has arrived with his staff, issues some orders. He sends messengers to the 1st and 4th Divisions to deploy into the valley using the southern route. Their response is tested, and while The Duke of Cambridge immediately orders the 1st Division to move, General Cathcart and his 4th Division, who are taking breakfast, refuse to respond. Several more orders from Raglan are refused. Raglan's second order is to Lord Lucan ordering him to deploy two Regiments of cavalry to support Sir Colin Campbell in his defence of Balaclava harbour. Lucan orders Scarlett and his Heavy Brigade to provide support.

Shortly after, the action around Redoubt No 3 begins.The Turks open fire with muskets and cannon taking out over 100 Russian infantry:


At the same time Redoubt No 4 opens up on the Russian cavalry in North Valley, causing over 50 casualties amongst the Cossacks:


However, the Russians quickly overrun Redoubt 3 and Cossacks gallop forward to cut down the fleeing Turkish survivors:

The redoubt above Kadioki protecting Balaclava Harbour has a pop at the charging Cossacks, but to no effect:


Liprandi seeing the damage being caused to his cavalry by the guns in Redoubt No 4 orders four cavalry regiments to capture the redoubt. The Turks fire shot and muskets downing a few cavalry, but unsupported, with their comrades from Rebout No 3 being cut to pieces by Cossacks, they break and are also destroyed.:

The Turkish gunners in Redoubt No 5, who are unprotected by infantry, fire a few shots into the cavalry before breaking and running down the hill. The Russians have taken the Causeway Heights and begin to consolidate their gains:

Meanwhile Scarlett has deployed two regiments of the Heavy Brigade on to the left flank of the 93rd; the empty Redoubt No5 can be seen to their front:

And, the skirl of the pipes can be heard as the Black Watch arrive at the head the 1st Division,

But it will take time for the whole Division to reach the field. Cathcart, having finished his breakfast and receiving three orders from Raglan, reluctantly orders the 4th Division to deploy across to Balaclava - probably too late.

So the scene is set for the next phase.................

Saturday 7 November 2015

Balaclava - Initial Dispositions

The allied army has woken up, however redoubts 4 and 5 and Canrobert's Hill off to the east have already fallen to the Russians. A few Turkish stragglers have escaped, but most have been cut down by Cossacks. Redoubt number 3 is now seriously threatened.


The Russians are advancing towards the ridge supported by artillery and a huge number of cavalry:


To the west the British cavalry have deployed to threaten the flank of any forces attacking towards Balaclava, with the Light Brigade looking down North Valley and the Heavy Brigade to the South:


The Turks defending Redoubt 3 prepare to receive attacking infantry:


The forces defending Balaclava, under Sir Colin Campbell, are alerted and he has deployed the 93rd Highlanders to a small knoll on his left flank. Some Turks have deployed across the road, while Marines hold the heights guarding the approaches to the port. A horse battery has deployed in support:


The battle is about to begin.

Balaclava October 25th 1854

The time has come and finally the troops are ready for this battle. Over the last few days I have been putting together the terrain and will refight my version of the battle during the coming week.

Here is the battlefield, looking from the South, set out on a 6 x 4 ft table:


It's a bit tight but the main features are there. The battle will begin at dawn with the Russian assault on the Causeway Heights. Victory will be allocated to the side in possession of the heights at the close of the battle. While the rules will be those used in the two previous battles I want to reflect the circumstances of the real engagement. I think there are several factors that need to be included:

1. The confusion of the 1st Division reinforcements, which marched and counter marched all morning due to several earlier false alarms.

2, The uncertainty within the cavalry Division, given that the commanders on the ground could not see what was visible to the high command up on the Sapoune Heights (compounded by the hatred between the Cavalry commander (Lord Lucan) and the commander of the Light Brigade Lord Cardigan).

3. The willingness of the Russian cavalry to take on the British which led to moments of hesitation.

The alarm has gone out and the British troops are taking to the field as the Russians close in on the Turkish positions on the Causeway Heights.

Sunday 23 August 2015

Turkish Artillery Strelets

The final Turkish artillery unit is finished - this time from Strelets. Not really Crimean figures, these are from the Russo Turkish war series, but they look the part and will do nicely. I replaced the guns with some Napoleonic muzzle loaders:


Meanwhile the British senior staff take tea and have their picture taken..............


Sunday 2 August 2015

British Siege Artillery - Strelets

Having made the gabions it was time to finish off the guns and crews. This is the remainder of the British siege artillery set from Strelets, consisting of two heavy cannon and crews. Here is gun number one:

Gun number two:

The positions were made to sit together to form a battery. Others could be added:


Saturday 1 August 2015

Gabions

Continuing the work on my British siege artillery, I have been trying to develop some redoubts in which to position two large naval guns and their crews. Rather than just building earthworks I wanted to add some gabions - huge wicker baskets, filled with soil. I have some resin ones, but they are needed for my Russian guns, so I thought I would try and make some.

The biggest challenge was finding the right material to make the wicker basket effect. I tried all sorts of wire and plastic strip. In the end I settled for the wire off an old computer mouse cable, which contained four very thin wires about a meter long each.

The wicker basket is supported by wooden stakes driven into the ground and then held in place with soil. I needed to make four and began the first pair by cutting out two rough squares of 2mm thick card.


 I then marked out where the wooden stakes would go

After this I drilled holes in the markers and inserted small lengths of wood cut from cocktail sticks:
Once this has dried (I used super glue), the fun bit began with weaving the wire around the stakes to create the basket:

Finally fine sifted sand was poured into the basket, which had a layer of PVA glue in the bottom. The sand was soaked with diluted PVA, with a dash of washing up liquid and the whole thing was left to dry. It took about two days to dry thoroughly, after which I painted the whole thing in dark brown:


I was quite pleased with the results. The next stage will be yo mount these on a base and add the guns and crews.