Douglas Miniatures Logo

Douglas Miniatures Logo

Thursday 25 November 2021

PSC Battle of Britain - Take 2

 Last time I dug this game out I had a go at setting it up and learning some of the rules; however, I was a little disappointed with the aircraft models, in that the game is more strategic where the models represent a raid of multiple squadrons.  Thus, the models are purely representative. I thought it might be better to try out the type of markers used during WW2 in the Ops Rooms, which indicate a complete raid.

 I made up some markers that reflect the units in the game, but also look like the real markers.  These were printed out on card  and stuck to a wooden base. I made some sticks to push them around too!


I then play tested a scenario with a German raid being intercepted over the SW coast. The markers in the top centre of the picture below represent two British squadrons of Spitfires and one of Blenheims vs a German bomber formation of three squadrons with no fighter escort.  The Germans were wiped out.

The markers worked quite well, although it became quite difficult to work out which group each marker belonged to, so since taking these pictures I have painted the marker bases to match the various group colours.  I will give this game another go, although I need to revisit the rules to check out some minor points.


Monday 22 November 2021

GNW More Swedish Infantry and Army Overview

 The final unit from my first batch of Great Northern War figures by Ebor has been completed.  In yellow facings, these figures represent the Bjorneborgs Regiment (which I am guessing is something to do with bears!). The flag does have a little black bear motif.


The completion of this unit means that the first phase of creating a small Swedish army is complete.  Here is an overview of the full army:


25mm Ros Figures Napoleonic French Cuirassiers

 Another unit comes off the production line as part of my occasional refurbishment of my old Ros 25mm Napoleonics.  These are originals from 1975, although the horses are not quite right.  I think that they are by Lamming, but are very similar to the Ros castings.  I can't remember how we acquired these horses, there must have been a sale on or something:


Friday 19 November 2021

Napoleonic Border Clash - A Two Bob Battle Report

The French advance guard has crossed into Austrian territory and is marching as fast as possible to seize a key bridge.  Alerted to this threat, a small Austrian force deploys across the road to block the French advance with their centre in a small village:

Both sides have seven infantry, two cavalry and two artillery units. The Austrians suffer from lack of mobility and the Austrian General (Me, Bob K) decides to form a defensive line with a hill on the left, the village in the centre and a small wood on the right.


The French (Bob B) adopt an aggressive stance and push cavalry out on both flanks, begin an artillery bombardment and rush infantry up the road in the centre.


The cavalry battle on the left flank involves Austrian and French Cuirassiers.  This becomes an epic struggle which lasts almost the entire game:

On the opposite flank French allies, Bavarian Light Horse, make short work of some Austrian Hussars and push their way around the Austrian right flank.

While this is going on French infantry reach the village and launch several assaults agains the Austrian infantry and artillery.  Each time they are beaten back:

The Cuirassiers continue to slug it out on the Austrian left and the battle rages in the centre, but now free to sweep around behind the Austrians the Bavarian horse become a significant threat. An Austrian infantry unit stands in their way, but fails to form a square and is punished by the Bavarian cavalry:

With the Austrian infantry swept aside the Bavarians crash into and destroy an artillery battery:

In quick succession the cavalry assault has swept up the Austrian right flank. General Bob B plans the Coup de Grace

An Austrian infantry unit deploys to block the Bavarian cavalry, forming square and beating the horsemen off:

But, the square becomes a sitting duck from French musketry and suffers accordingly. 


At the same time the Austrian Cuirassiers are finally overwhealmed by their French counterparts and leave the field. The way is open and with the Austrian right completely destroyed, the French gain the road beyond the village The Austrians reach their exhaustion point and concede.  Both sides halt for lunch (pork pie, corned beef rolls and tea), but it is an Austrian defeat 5 - 2.

A great game that hung in the balance for a while, but the Bavarian cavalry changed all of that.  

The figures are mostly 25mm Ros Figures, with some Minifigs added.  The Austrian commsnd are all Warrior Miniatures.


Monday 15 November 2021

GNW Swedish Cavalry

Finished last week, I am now able to post a couple of pictures of the Great Northern War Swedish cavalry.  Once again these are by Ebor and very nice figures they are.  The separate heads are a bit of a fiddle but otherwise easy to assemble:


Just one infantry unit left to finish from this batch, after which I will post a picture of the complete army, well brigade!

Friday 12 November 2021

Punative Expedition to the Pushna Valley 1936

This scenario is inspired by chapter 27 of  Donald Featherstone's book, Campaigns for Wargamers, except that mine is a single action in the valley rather than a complete campaign.

My scenario sees the notorious Malik-Ghazi tribe being responsible for a number of raids on convoys passing close to the Pushna Valley.  Three weeks ago, a convoy of military stores was attacked and plundered.  Included in the cargo were Lee Enfield rifles, Vickers machineguns and artilley and small arms ammunition.  All of this is now in the hands of the Malik-Ghazis.

2nd Battalion Grampian Highlanders has been tasked to attack and destroy the base of the Malik Ghazis, which is located in the mud fort at the head of the Pushna Valley. The tribesmen are now very well armed, although not well trained, but they are adept at making improvised weapons and fortifications.

The valley is a strong defensive area, with the only vehicle route running through the valley floor. Beyond he valley the terrain is very rocky and difficult. Here are some views of the valley and intelligence reports indicate that the high valley walls are defended with sangars and the valley floor has improvised mines made from the looted artillery shells:

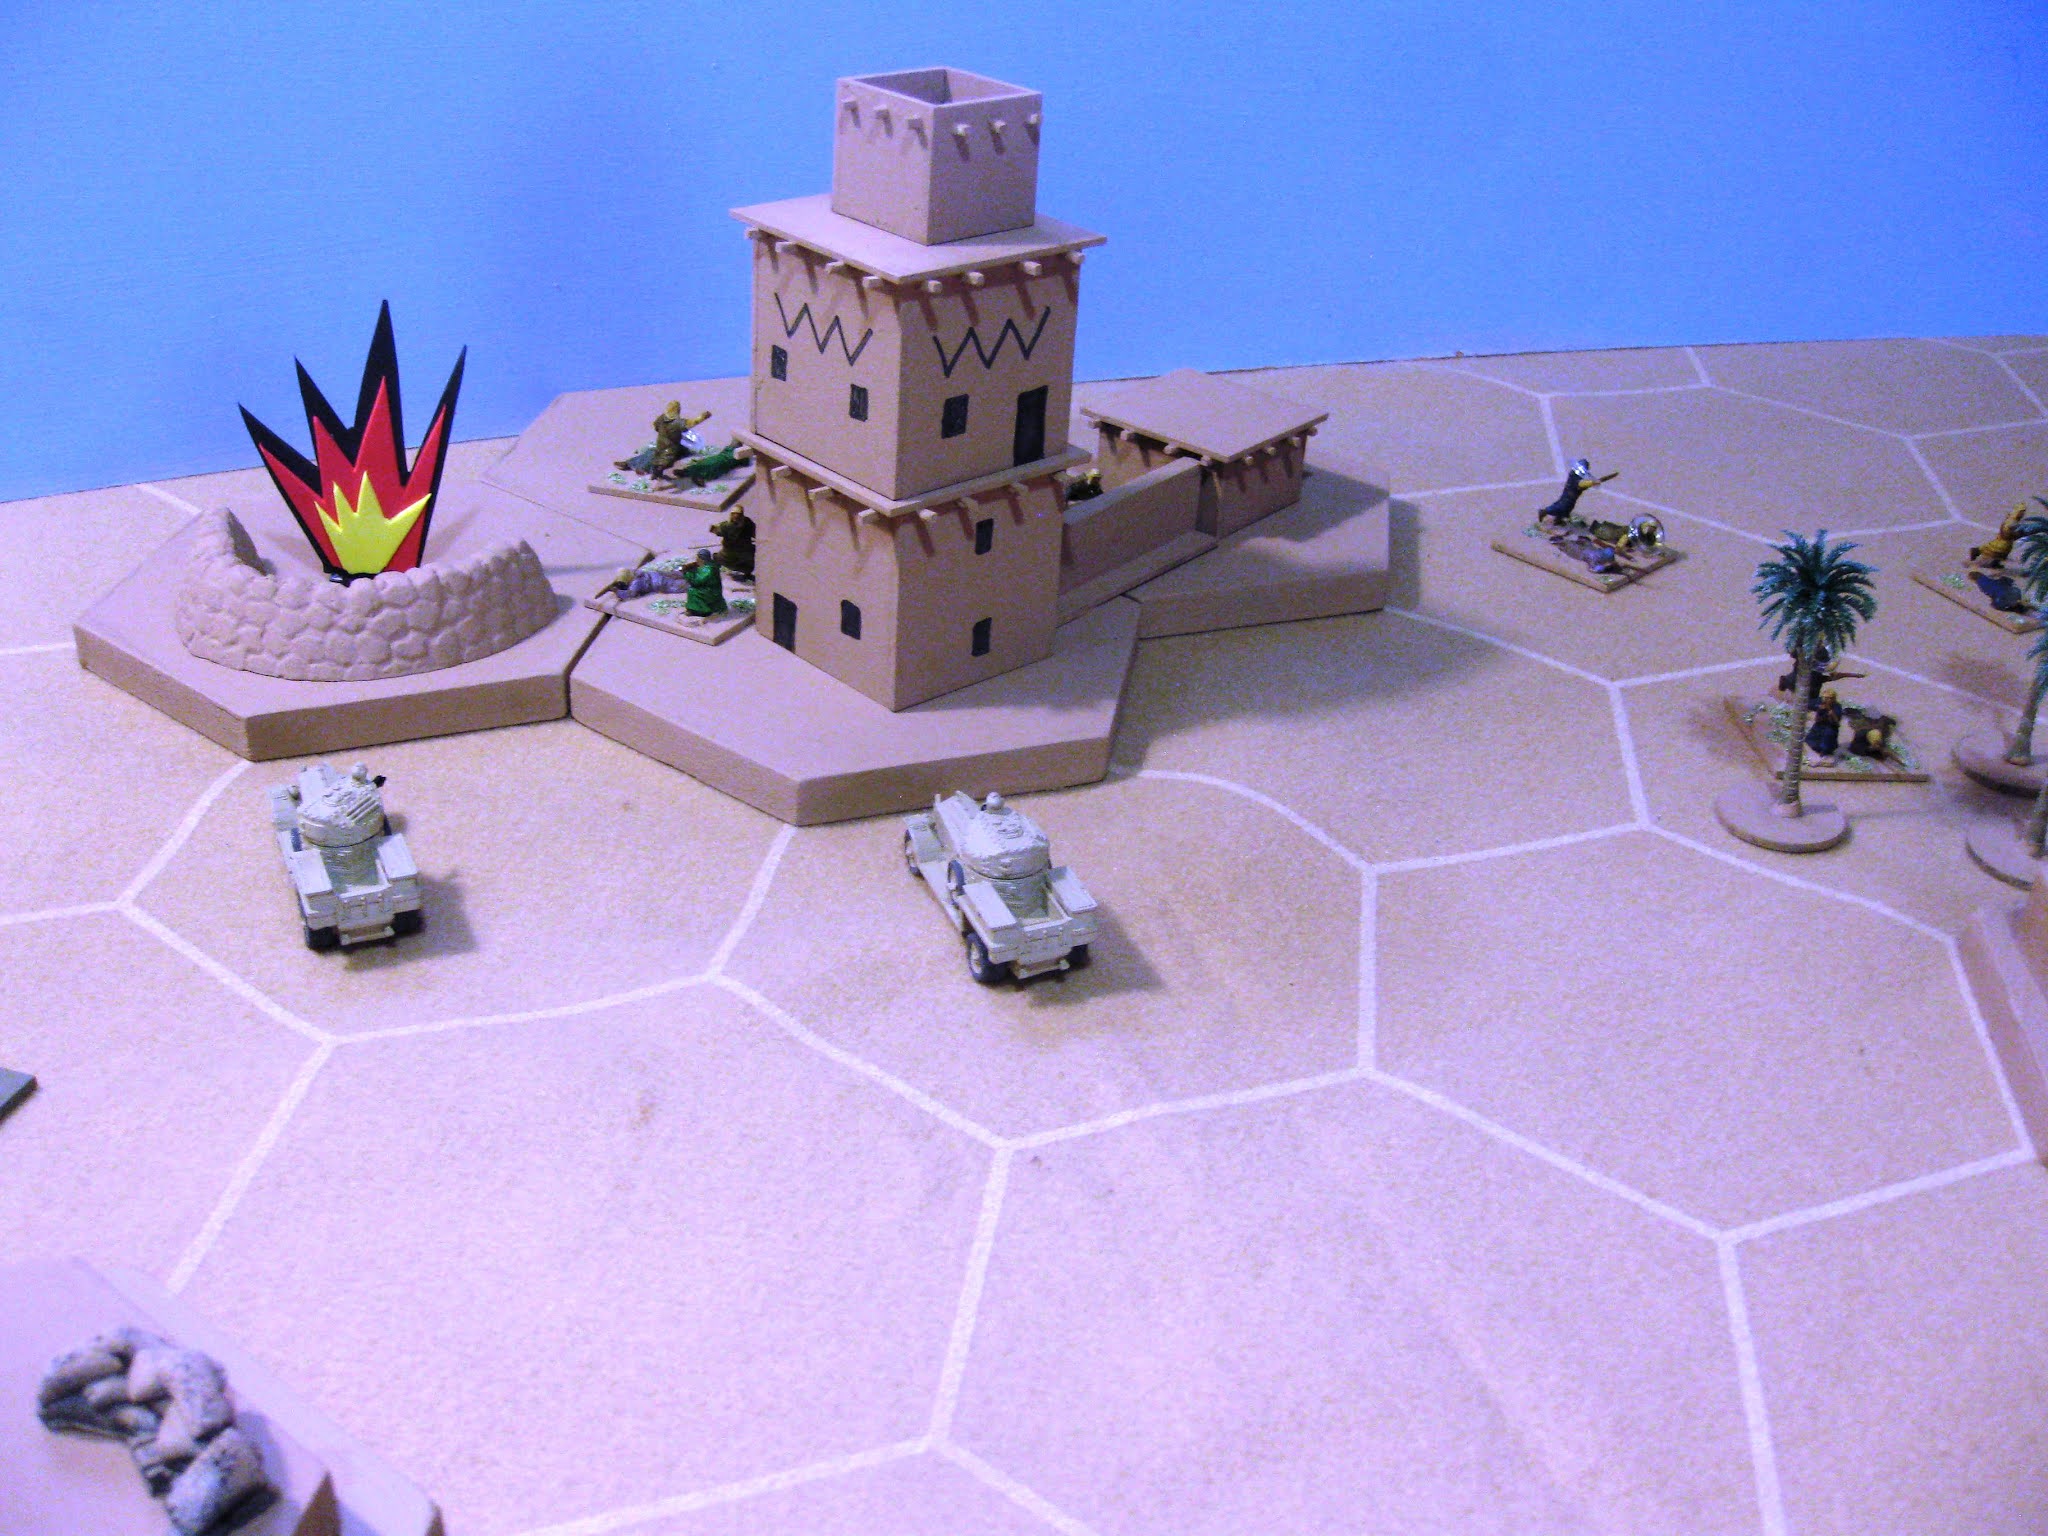
The head of the valley is defended by a mud fort:

The British force consists of A & B companies of the Grampian Highlanders (GHldrs), with HQ and Support Company elements, including two Vickers sections, a 3" mortar section and two troops of Royal Engineers. The force has a squadron from the Chiltern Hussars, equipped with machinegun armed Rolls Royce armoured cars:

The British plan is to sieze the two high bluffs on each side of the entrance of the valley then roll up the Malik-Ghazi positions on the two ridges.  Once achieved a two pronged attack against the fort will begin. CO GHldrs has forbidden the armoured cars to enter the valley proper until the engineers have cleared any mines.

The attack begins as the two companies, bagpipes playing, advance towards the bluffs supported by mortar and machinegun fire:


 The tribesmen in the rocks at the foot of the bluff are quickly cleared but soon intense fighting begins as the GHldrs work their way in closer and up onto the ridge


Casualties are quite heavy and one platoon is destroyed by fire coming from the sangars, however, with the heavy weight of machine gun fire the Malik-Ghazi forward positions fall:

After more casualties and a couple of setbacks, under heavy fire, both bluffs are captured:


With the threat from the high ground reduced the engineers begin to clear the mines:

Slowly the resistance on the valley walls reduces as positions are abandoned by the tribesmen, although they continue to cause casualties amongst the British:

The two Malik-Ghazi machine guns create a cross fire that cuts down HQ Company, but the CO, who has moved too far ahead of his troops is fortunately not hit and the pipes continue to play. The mortars are brought to bear against the machinegun postions as infantry work along the ridge:


The machineguns are cleared and most of the tribesmen have withdrawn or fled back towards the fort having lost many men. At the same time the engineers have cleared a path through the valley, somehow not gaining any casualties.

The armoured cars move forward and bring heavy fire onto the defenders in the fort:


With mortar fire raining down on the mud fort the tribesmen decide they have had enough and run off into the countryside beyond. Trucks with explosives are brought up and the British blow up the fort and the arms and ammunition looted earlier.

A win for the British, although all platoons have sustained some casualties and HQ Company has been severely mauled. 

All of the figures (apart from 2-3) are by Airfix and the armoured cars are laser printed. The fort is scratch built made from scrap MDF and matchsticks.


Tuesday 9 November 2021

Brief Encounter - Crimean Skirmish 25th September 1854

This rather strange action is based upon an incident at a remote location on Mackenzie heights, known as Mackenzie's Farm, when the British army blunders into the tail end of Russian Prince Menschikov's field army that had departed Sebastopol to protect Russian lines of communication.

An abridged version of events from Cadogan's Crimea, published in 1856:

............. Lord Raglan followed the road which the artillery had been ordered to take and trotting on, placed himself at the head of the column on the line of march. After proceeding for about four miles through the forset the trees became thinner, and it was evident that we should soon be clear of them.  Lord Raglan had been there for some time wondering that we had not come upon the cavalry, who had been ordered in advance, and therefore sent two staff officers into the wood on our right to try to find them. Two hussars  and a staff officer up ahead reported sighting Russian troops on the road just in front of them. General Airey rode forward with his ADC to see what they were and returned minutes later and announced that they had seen a Russian convoy or troops on the line of march passing northwest along a road at right angles to the one we were on. More staff officers were sent off to find the cavalry and the 2nd Rifles were ordered to hurry up. The horse artillery were ordered to readiness and to advance immediately the cavalry got up.

A contemporary map of the area:


This is where I join the action, with the 2nd Rifles moving forward and the horse artillery deploying.

The board is set up showing the road with the Russian column of wagons, infantry and Cossacks:

Lord Raglan and his headquarters emerges from the woods:

While the cavalry that should have been in the vanguard blunder along the wrong track:

At this point the Russians spot the British and raise the alarm:


Raglan sends a staff officer to recall the cavalry and the horse gunners move into the area of the farm to deploy while the Rifles move up. However, a Russian battlaion deploys across the British front and begins firing at the British artillery:


In this battle the Russian continually gain the initiative, while the British are in chaos. Russian musket fire starts to topple the British gunners and a regiment of Cossacks deploys to support their infantry:

The Cossacks charge the rifles who while deploying into line manage to loose off a volley into the Russian cavalry, but the Cossacks make contact with the British infantry:

The Rifles are cut down and break and run off into the trees.  Meanwhile the Russian infantry close in on the horse artillery in the farm and cut the gunners down. 

As all this was going on the Scots Greys arrived having newly arrived in the Crimea and having missed the Battle of the Alma were keen for some action.  They charged headlong into the Cossacks sending them packing:

However a second Russian infantry regiment had deployed to the front of the Scots Greys and the Russians, now in the farm, began pouring volleys into the exposed British cavalry.  Casualties were heavy and the Scots Greys retreated back down the road:

With the British beaten off the Russian columns and wagons were able to move off unmolested and the action was over.

A clear win for the Russians!

In the real action, which saw the British commander through error being at the point of the column,  the Russian battalion loosed off a volley or two which went over the heads of the British with no effect.  The artillery and rifle fire caused the Russians to turn on their heals and they fled. Little more happened and the British captured the wagons, tons of supplies, some drunks and a lot of loot, although a few Scots Greys were killed by Russians that played dead amongst the baggage. 

The figures used are S range Minifigs, originally from the Alan Cook collection. Rules were adapted from C&C Battlecry.


Sunday 7 November 2021

More GNW Swedish Infantry

My second Swedish infantry regiment for the Great Northern War comes off the production line. Painted to represent the Narke-Varmalands Regiment, the unit is made up of 25mm figures from Ebor Miniatures.  They are painted gloss using mainly Humbrol paints.


Next will be my first cavalry regiment.
 

Wednesday 3 November 2021

Great Northern War - Swedish Commanders

Coming off the production line are some more Swedes.  Also by Ebor, these figures form the Swedish command pack, consisting of three mounted officers. They were easy to paint using gloss colours:


I also have some cavalry and another infantry unit nearing completion.