Douglas Miniatures Logo

Douglas Miniatures Logo

Saturday 12 October 2024

More adventures with Speed Paints

 Over the past few weeks I have been dabbling with painting 25mm figures using Army painter Speed Paints.  Overall I have enjoyed using them, however, I had run into difficulties with the paint bleeding into lighter colours (especially red) and later in applying white.

My solution has been to paint most of the colours in the normal way with Speed Paints, which is very quick.  Once dry, I then give the figures two coats of Army Painter matt varnish.  It is then possible to paint on the detail, such as cross belts and shako cords.

Overall, not brilliant, but acceptable and an easy way of churning out multiple battalions.  Here we see three units, one Portuguese and two British line.  They are a mix of figures.  The Portuguese are mostly Ros British and the British are in the main Minifigs S range.  


Monday 7 October 2024

British WW2 Heavy Artillery

 I recently took charge of a portion of the Eric Knowles WW2 collection.  I now own the 1940 British and early war Germans, or some of them at least.  As always, there is some rebasing and organising to be done.  Unfortunately, I did not get all of the British artillery and thought it would be nice to have some heavy guns, although I am not too sure how I would fit them onto my 8 x 4 table!

So, with reinforcements in mind, I purchased a couple of Resin 7.2" howitzers and a Strelets 6" gun, to provide the crew, which are dressed largely in 1940s, early war uniforms.  A couple of Oxford Diecast gun tractors were also purchased.

I had a lot of fun putting this lot together and here is the result:


I have some Vickers light tanks and Matildas to paint, along with a load of German horse drawn transport. I should soon be ready for a game or two.


Tuesday 24 September 2024

Mystery Figure

 I was wondering if anyone knows what this figure might be.  I have checked all the usual places that have information on early Minifigs to no avail. It is possible that someone has one of these in their collection.

He is most likely from the 25mm Minifigs S Range and may well be from the Colonial range; CC2s Moroccan Cavalryman.

Also in the Minifigs catalogue, under the French Revolutionary War, there is a figure listed as FRC 7s, Syrian Horse Lancer. Again, does anyone know of this figure and maybe what it looks like. Could the figure above be this one?  Or could the figure be something completely different.


Any information would be gratefully received.

Monday 23 September 2024

Rolica 17 August 1808

 This is a battle in the Command & Colors scenario book that I have been wanting to try for several years.  However, a visit by Phil and the fact that Will had deposited his 20mm Anglo/Portuguese army, along with his French for safe keeping presented an opportunity not to be missed.

So, the table was set out as per the scenario we chose sides; I was the Anglo Portuguese while Phil played the French.


Having set out the scenery, this is the table ready for play:

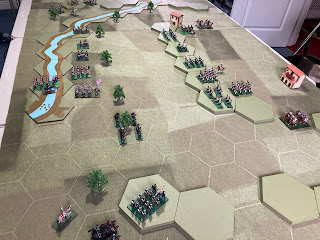
A view across the battlefield, with the French firmly installed upon the long ridge.
As the Allied commander, I thought that this would be quite an easy action.  How wrong I was! My plan was to demonstrate on the French left, with the hop of drawing off reserves from the centre, attack in the centre to pin the French on the ridge and then sweep around the French right flank.  First of all I needed to clear the river and bring my artillery into range.  The British battalions under the command of Wellesley wade across the river and secure the far bank.

Over on the Allied left flank the Fergusson's British move more cautiously, as Phil deploys some light cavalry round the rear of Rolica village.
Meanwhile, Trant's Portuguese, supported by some Cacadores and cavalry advance on to the French left.  the French counter move with some light troops and hussars.
British light infantry hold a wood to secure the crossing, but cannot advance due to the cavalry threat
Over on the Allied right, the French counter attack causing casualties amongst the Cacadores, who are forced into a close combat brawl.
The French Hussars attack and drive off the Portuguese cavalry, while the Portuguese line are pushed back having also suffered casualties.
With the Portuguese attack being largely blunted a second Portuguese line battalion moves up to stabilise the situation.
Although the Allied right flank attack was repelled quite quickly, in the centre the british battalions, having crossed the river, move towards the ridge.  It looks a daunting task.
An over view of the situation at this point.  Allied artillery now has the range of the French on the ridge, as the British attack goes in.
Predictably, the British battalions suffer heavily and pull back, but another battalion moves up in support.
A further British battalion crosses the river on the left, mindful of those pesky French Hussars.
On the Allied left things are more successful.  Led by General Fergusson, a battalion moves around rolica village and begins to climb the ridge, having driven off the French Hussars.
While this is going on Wellesley rallies the British battalions in the centre and moves once more towards the ridge.
battle is joined, with most of the French infantry pushed back.  The sweep around the outnumbered French right forces a general French withdrawal.  
This is a costly win for the Allies with the score being 6 - 5.  The French pull back to a second ridge line as the Allies reorganise for a second attack.

Although the Allies were victorious, this turned out to be a more challenging battle, not helped by some rotten dice rolls by the Allies!


Tuesday 17 September 2024

Operation Market Garden Part 2

 It has been longer than I had hoped to conclude this battle, but events have conspired against us.  COVID has stuck in Will's household and then Phil arrived and we played three Napoleonic battles (more later).  After Phil departed I was struck down with a bug, which I thought might also be COVID, but turned out to be something else.  Eventually I finished off the game but had to do this solo, which worked but was not as satisfying.

In the last instalment, the US 101st Airborne had captured the Grave Bridge and linked up with XXX Corps, who had pushed up through Eindhoven.  However, the US 82nd Airborne was still a long way from taking Nijmegen and its important bridge, having fought off numerous attacks from German armour and infantry. 

Meanwhile, British 1st Airborne was struggling in the outskirts of Arnhem and so far had failed to make into the town and onto the bridge.

The situation hangs in the balance.

Some XXX Corps tanks meet up with the now depleted 82nd Airborne and begin their move towards Nijmegen:

In Arnhem, 1st Airborne close in on the town but struggle to shift the determined German defenders.  Meanwhile, more Germans arrive from the south to beef up the defences.
1st Airborne attempt an assault using two battalions, and while they cause some damage they fail to evict the German defenders, who receive additional armor and infantry.
German artillery south of the river is also now in range of the British paras.  The British attack is beaten off with the Germans now heavily reinforced.
Back at Nijmegan attacks by the 82nd supported by tanks fail to get close to the town and its bridge.  The Germans try to demolish the bridge, but fail on their first two attempts.
With the 82nd held off and 88mm guns destroying the tanks on the highway the Germans try a third time to blow the bridge.  This time they succeed and the situation for the allies has altered significantly
Up in and around Arnhem the Germans now outnumber the British airborne, who now have less than a Brigade that is operational.  They conclude that the town cannot be taken.  Furthermore additional German troops are moving up from Nijmegen now that the bridge has been destroyed.
The battle ends at this point.  There can be no allied attempt to force a crossing at Nijmegen until XXX Corps moves up, captures the town and builds a crossing.  The 1st Airborne cannot take the Arnhem bridge and will simply have to hang on or be captured.  
This was a very interesting and enjoyable game.  For the Allies it is a very tricky situation and the battle was lost (I feel) because the 82nd could not get into Nijmegen.  They should have moved faster and not become embroiled in the battles to the north of Eindhoven during the early stages of the operation.  

A scenario worth playing again!

Sunday 8 September 2024

Lone Star Paratroopers - The Mortar Section

 A little weekend project saw the painting of these wonderful old figures by Lone Star Harvey.  They date back to the 1950/60s and I have a couple of boxes of them.  There is another set in berets, but they have more modern weapons and wear battledress.

These figures make up the Mortar Platoon.  Somewhere I have some loaders, which I will add when I dig them out.

I painted these using Speed Paint, however, unlike my ancient figures I gave them a sepia wash and when that was dry, I dry brushed them to give some highlights.  

I am quite pleased with the results:


Friday 6 September 2024

Minifigs Plains War Figures (The IW Range)

One of the readers of this blog shared some images of a lesser known Minifigs 25mm range that covers the US Plains Wars (Indian Wars) between the US army and the Native American tribes.  The range started off as part of the early S Range, then morphed into the current more 'chubby' style range. There is scant information available (or if there is it is hard to find) about these figures and there are some gaps in our knowledge.

Listed below are pictures of examples of what is known to exist from both the old and current ranges:

1. The four examples of 25mm mounted Minifigs S range U.S. cavalry for the 'Indian Wars' series.

2. A comparison between the S Range Indian Wars on the right and the S Range ACW US cavalry mounted figures on the left:

3. The complete 25mm Minifigs IW Native American range:


4. The complete IW S Range Native American 25mm Minifigs:
5. Four infantry and four gunners:

6. An infantryman and four gunners produced by Minifigs, that have the same IW codes on the bases, but are clearly different sculpts (perhaps an interim range?).


7. Two U.S> dismounted cavalrymen; 25mm Minifigs castings from the later (current) 25mm range.

8. Examples of current range U.S. cavalry (top) and Native American horses.
Of not, the current range figures in photos 5 and 6 are different castings but bear the same codes. Were there two ranges produced by Minifigs?

I would be interested to hear from anyone who has more knowledge about these figures and can explain the odd arrangement of different figures with the same codes.  Does anyone have a collection of these figures, both current and S range?

I note that on the Miniature Figurines website that the IW range is currently out of production, but there is a list of figures, as illustrated above.


Sunday 1 September 2024

Operation Market garden

Part 1

Today Will visited,  providing the opportunity to play a game or two:

Operation Market Garden is a battle, or series of battles I have wanted to try for a long time.  I have had an eye on the Memoir '44 scenario, which is played using the 'Overlord' rules.  The map is enormous and quite complex.  To make things even more problematic, I wanted to use figures on a wargames table.  After pondering for a while, I decided upon 1/300th scale figures and vehicles.  I already had most of the stuff needed to represent XXX Corps as well as the 1st Airborne Division.  The Germans were also largely catered for and I just needed to make up some more infantry units. Most of the scenery was also available.

This is the Memoir '44 scenario (north is on the left):

As can be seen, although complicated, it is a rather simplified version of the campaign map.  The many waterways and canals are reduced down to the three main crossings; Arnhem, Nijmegen and the Meuse/Wilhelmina Canal bridge to the north of Eindhoven (I assume this to be the Grave bridge).

As I planned to use figures I decided upon a larger battlefield, which was set out on an 8 x 4 table.  Here is a picture taken during the setting up.  Arnhem is closest to the camera, then Nijmegen, with Eindhoven in the distance, with the three main water obstacles clearly visible:

The battle begins on September 17th 1944, the landings have taken place and minor rivers and mopping up of isolated German units is complete.  However; the germans are now alerted and are pushing reinforcements into the area from the east.  

Here are the opening stages. The British 1st Airborne Division has landed west of Arnhem and is starting to move towards the town in an attempt to seize the bridge (top right), while the US 82nd Airborne Division has landed south and west of Nijmegen, tasked with capturing the town and its bridge (top left):

XXX Corps cross the start line (the bridge is missing!):

In the area of Eindhoven, US paratroops of the 101st Airborne Division have landed between the town and the Grave bridge.  German reinforcements are on the move and in the distance, top left, the leading elements of XXX Corps can be seen.

The 101st attempt to rush into Einhoven to secure the route for XXX Corps and a brisk battle breaks out.
Meanwhile, the 82nd Airborne begin to move towards Nijmegen, which is strongly held by german infantry.

Up in the north, the British begin to advance from the landing ground:

Back in Eindhoven elements of the 101st become embroiled in a battle on the northern outskirts of the town and take heavy casualties:
The 101st hopes are raised as tanks of XXX Corps begin to engage the Germans in villages to the south of Eindhoven.  However, German tanks arrive and begin to drive the US paratroopers out of the northern outskirts:
The 101st are forced back away from the bridge.  One of their landing grounds are captured, but US anti-tank guns also reduce the german tanks.  despite managing to force back the 101st and halt the XXX Corps advance only a small element of the original German force clings on to the town.

Up in the north the British airborne reconnaissance dash forward in their jeeps and ambush some German armour, but take heavy casualties.


The German column is severely mauled, but the remaining tanks destroy the jeeps and their crews:
Despite the heroics of the recce jeeps, this does not stop more heavy armour rolling into Arnhem town, although a parachute battalion manages to get into the eastern woods, but with heavy casualties. The newly arrived tanks begin to cut up the lightly armed british paratroopers.

Some help comes in the shape of some RAF Typhoons, but they cause little damage and the tanks maintain their onslaught.
German infantry sweep away the remnants of the parachute battalion
The German infantry move into the town as more infantry rush forward along the far side of the river.
Another allied airstrike comes in, this time it is US P-51s.  This time the effect is much more damaging and several tanks are destroyed.  But, the British paratroops are unable to enter the town and capture the bridge.

Back down towards Eindhoven the 101st Airborne, now with support from the tanks and artillery of XXX Corps clear the last german resistance from the town.  The US paratroopers capture the bridge over the Meuse.

The leading tanks of XXX Corps cross the Meuse, via the Grave Bridge.
However, the 82nd are far from taking the Nijmegen Bridge and the German are massing reinforcements in the town.
Unfortunaetly Will had to depart rather urgently and so the battle was suspended at this point. I am hopin to continue in a few days time.