Having made the gabions it was time to finish off the guns and crews. This is the remainder of the British siege artillery set from Strelets, consisting of two heavy cannon and crews. Here is gun number one:
Gun number two:
The positions were made to sit together to form a battery. Others could be added:
Douglas Miniatures Logo
Sunday, 2 August 2015
Saturday, 1 August 2015
Gabions
Continuing the work on my British siege artillery, I have been trying to develop some redoubts in which to position two large naval guns and their crews. Rather than just building earthworks I wanted to add some gabions - huge wicker baskets, filled with soil. I have some resin ones, but they are needed for my Russian guns, so I thought I would try and make some.
The biggest challenge was finding the right material to make the wicker basket effect. I tried all sorts of wire and plastic strip. In the end I settled for the wire off an old computer mouse cable, which contained four very thin wires about a meter long each.
The wicker basket is supported by wooden stakes driven into the ground and then held in place with soil. I needed to make four and began the first pair by cutting out two rough squares of 2mm thick card.
I then marked out where the wooden stakes would go
After this I drilled holes in the markers and inserted small lengths of wood cut from cocktail sticks:
Once this has dried (I used super glue), the fun bit began with weaving the wire around the stakes to create the basket:
Finally fine sifted sand was poured into the basket, which had a layer of PVA glue in the bottom. The sand was soaked with diluted PVA, with a dash of washing up liquid and the whole thing was left to dry. It took about two days to dry thoroughly, after which I painted the whole thing in dark brown:
I was quite pleased with the results. The next stage will be yo mount these on a base and add the guns and crews.
The biggest challenge was finding the right material to make the wicker basket effect. I tried all sorts of wire and plastic strip. In the end I settled for the wire off an old computer mouse cable, which contained four very thin wires about a meter long each.
The wicker basket is supported by wooden stakes driven into the ground and then held in place with soil. I needed to make four and began the first pair by cutting out two rough squares of 2mm thick card.
I then marked out where the wooden stakes would go
After this I drilled holes in the markers and inserted small lengths of wood cut from cocktail sticks:
Once this has dried (I used super glue), the fun bit began with weaving the wire around the stakes to create the basket:
Finally fine sifted sand was poured into the basket, which had a layer of PVA glue in the bottom. The sand was soaked with diluted PVA, with a dash of washing up liquid and the whole thing was left to dry. It took about two days to dry thoroughly, after which I painted the whole thing in dark brown:
I was quite pleased with the results. The next stage will be yo mount these on a base and add the guns and crews.
Sunday, 26 July 2015
Some more Cossacks - Zvezda
Today I completed a group of Cossacks that I have been working on for a couple of months, In the uniform from the Don region they are a spirited bunch and complete the cavalry required for the Balaclava refight. These figures are by Zvezda and I think were also produced by Italeri:
Monday, 20 July 2015
More French Line Infantry - this time from B&B
I bought these figures off Ebay many months back, largely for the artillery crew in the same lot and have been slowly working my way through them. They are really Franco Prussian war troops but looking at contemporary pictures it seems that the kepi was widely worn in the Crimea in preference to the shako, so they do not look out of place. They are manufactured by B&B Miniatures and I have to say that I really like the detail and animation.
Friday, 10 July 2015
Deviation!!
Whilst planning the battle of Balaclava I was led astray when I opened this book:
Suddenly, memories of wargames past began to emerge followed by the opening of dusty boxes. I was smitten by the simple rules and fun factor that this great little book presents. So, for the time being, Balaclava is shelved while my Napoleonic troops marched on to the field once more. I decided to fight a small action using the above rules, except that I have a hexagon based table, rather than using measurements for moves and range etc.
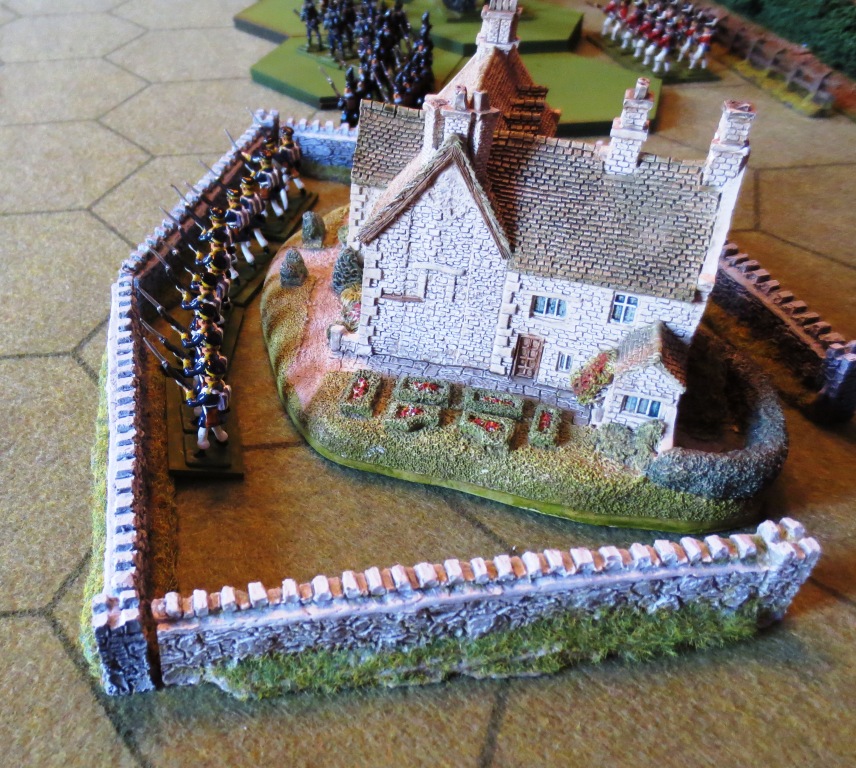
The battle is set towards the end of the Napoleonic wars with the French attempting to delay a British/allied force at a bridge over a shallow river. The bridge is vital for the movement of supplies and artillery, but the river is easily fordable by infantry and cavalry. This is the battlefield looking from the French side. On the left is a small farm, a village in the centre overlooks the bridge, with fields and hedges on the right. There is high ground to the rear:
This is a sort of a meeting engagement, although most of the French are in position, with just the light cavalry, still out on flank patrols with the horse artillery still to arrive. The British Army is just appearing:
Here are the French positions:
On the left the farm and wood is held by a Bavarian Brigade:
The centre by a line Brigade with a Grenadier battalion in the village:
With a third line infantry Brigade on the right holding the lane with its high hedges:
In reserve is a Guard Grenadier Regiment of two Battalions.
The British survey the field and decide that the right flank looks the best option and decide to throw two brigades against this area, using the third to fix the French right flank. The army begins to concentrate round to their right flank:
As the remaining British/Allied forces arrive on the field:
The allied left flank is held by a Hannovarian unit, which occupies the large stone farm:
By mid afternoon the British are in position and beginning their assault, The Bavarian held farm looks to be a tough nut to crack, as British horse artillery start to soften them up:
The Bavarian commander oversees what will be a hot action:
Meanwhile, over on the left flank the 60th Rifles skirmish forward and start to irritate the French in the village. The British Guards remain in reserve:
On the British right, seeing the attack building up, the French commander orders forward a Regiment of dragoons:
...and the British commander counters with his own heavy cavalry, after which a brisk melee ensues:
A regiment of Brunswick Hussars moves around to the right to counter the increasing French cavalry threat. The horse battery on the knoll continues to fire into the village.
Suddenly, memories of wargames past began to emerge followed by the opening of dusty boxes. I was smitten by the simple rules and fun factor that this great little book presents. So, for the time being, Balaclava is shelved while my Napoleonic troops marched on to the field once more. I decided to fight a small action using the above rules, except that I have a hexagon based table, rather than using measurements for moves and range etc.
The battle is set towards the end of the Napoleonic wars with the French attempting to delay a British/allied force at a bridge over a shallow river. The bridge is vital for the movement of supplies and artillery, but the river is easily fordable by infantry and cavalry. This is the battlefield looking from the French side. On the left is a small farm, a village in the centre overlooks the bridge, with fields and hedges on the right. There is high ground to the rear:
This is a sort of a meeting engagement, although most of the French are in position, with just the light cavalry, still out on flank patrols with the horse artillery still to arrive. The British Army is just appearing:
Here are the French positions:
On the left the farm and wood is held by a Bavarian Brigade:
The centre by a line Brigade with a Grenadier battalion in the village:
With a third line infantry Brigade on the right holding the lane with its high hedges:
In reserve is a Guard Grenadier Regiment of two Battalions.
The British survey the field and decide that the right flank looks the best option and decide to throw two brigades against this area, using the third to fix the French right flank. The army begins to concentrate round to their right flank:
As the remaining British/Allied forces arrive on the field:
The allied left flank is held by a Hannovarian unit, which occupies the large stone farm:
By mid afternoon the British are in position and beginning their assault, The Bavarian held farm looks to be a tough nut to crack, as British horse artillery start to soften them up:
The Bavarian commander oversees what will be a hot action:
Meanwhile, over on the left flank the 60th Rifles skirmish forward and start to irritate the French in the village. The British Guards remain in reserve:
On the British right, seeing the attack building up, the French commander orders forward a Regiment of dragoons:
...and the British commander counters with his own heavy cavalry, after which a brisk melee ensues:
The British come off the worst and withdraw, but the French cavalry are disordered and start to receive fire from the British infantry and they too pull back, but pose a threat on that flank.
The British assault now hits the farm and the Bavarians begin to falter and eventually break:
The second Bavarian Battalion is now in a difficult position; however, the French Hussars have arrived on the field, and one regiment is immediately sent to the threatened flank:
The French commander comes to survey the situation and is concerned about the British build up.
He orders the newly arrived hussar to attack!
Seeing the attack coming the British hastily form square and do so just in time. The hussars are doomed:
The shattered hussars, which receive fire from the farm, beat a hasty retreat, leaving a third of their number on the field.
Meanwhile over towards the bridge the Fusiliers and Highlander move up towards the village:
A regiment of Brunswick Hussars moves around to the right to counter the increasing French cavalry threat. The horse battery on the knoll continues to fire into the village.
Over on the left the French deploy a Battalion of voltigeurs to counter the annoying riflemen, who start to suffer casualties.:
Back on the right the remnants of the Bavarians are driven off and the British begin to threaten the village, although the right hand Brigade is beginning to weaken having fought through the farm and into the fields beyond.
To counter the growing threat the French commander orders one of the guards battalions to bolster the village area:
and a horse battery, which arrived in the field with the hussars:
This is just in time as the British begin to emerge over the hill and around the woods and a combination of volley fire from the newly arrived guards and canister from the horse artillery shatters the 4th of foot:
Meanwhile the rifles on the left flank are reinforced by some Brunswickers who begin to fight off the voltigeurs:
At this point attention shifts towards the centre as the British fusiliers and highlanders press towards the village, while the French now have an attack on two flanks and begin to crumble. The French commander decides to commit his second guards reserve Battalion into the centre of the village:
He also decides to move a battalion of fusiliers across from the right:
For the French guards in the village there is no where to go, other than a headlong charge down the road into the advancing British - this is the crux of the battle, with all reserves committed by the French and the British taking mounting casualties. The French guards charge headlong into the Highlanders, who manage to loose off a volley and hold their ground:
The French lack the numbers to defeat the British and they are gradually reduced until they crack.
The voltigeurs on the French left take heavy casualties and flee:
...and meanwhile on the right the Brunswick cavalry arrive, force the guards into square and see off the French horse artillery.:
In a desperate act the French commander orders his last cavalry regiment in to beat off the Brunswick hussars and a cavalry melee breaks out, while the British pour lead into the French guards square. French morale begins to sink.
The British guards are now committed and they engage the French on the right of the village:
and then it is all over - despite heavy losses the Allies have captured the bridge and the village; the French begin withdraw while they can:
What fun! It was great to dig out my old 1970s Minifigs and a few Garrison and put them into the field once again. Now, Balaclava - where were we?
Subscribe to:
Posts (Atom)